


Building an efficient factory in Arknights: Endfield without guidance is a recipe for frustration. You’ll spend hours connecting machines, tweaking belt routes, and scratching your head over why your production chain keeps stalling. Meanwhile, the community has already solved these puzzles and shared optimized blueprints that work right out of the box.
I wasted my first three days trying to design everything from scratch. Pride got in the way of common sense. Once I swallowed that pride and started importing community blueprints, my factory output tripled overnight. The game literally has an import system built in because the developers know most players don’t want to become amateur industrial engineers just to craft some batteries.
how to import blueprints in arknights endfield
Before diving into specific builds, you need to know how the import system works. The process is painless once you’ve done it a couple times.
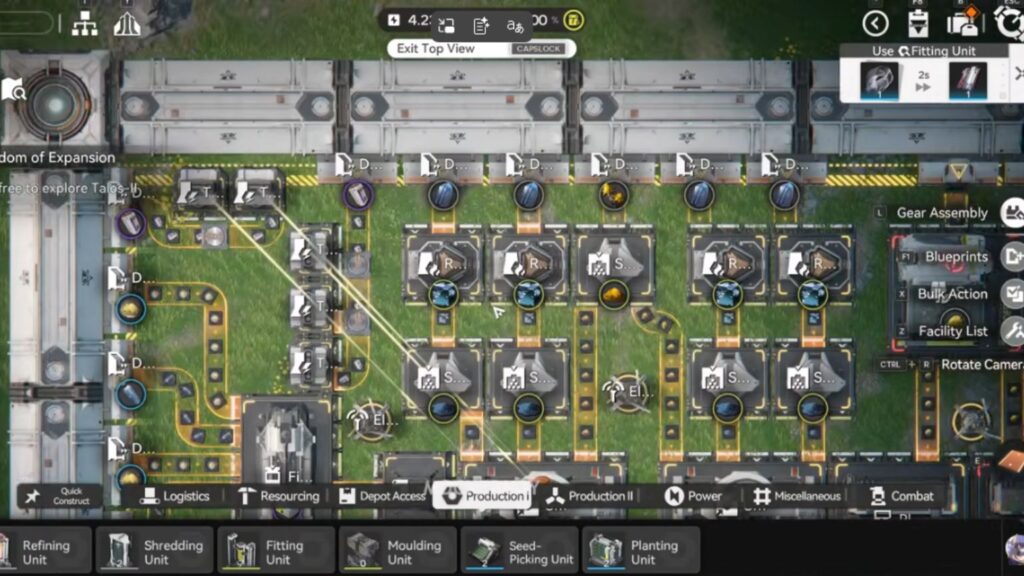
While exploring the open world in AIC mode or standing inside your factory, press F1 to open the blueprint menu. Navigate to the Shared Blueprints tab and click Import Blueprint at the bottom of the screen. Paste the code string into the text box and confirm. A preview appears showing exactly what you’re about to build. Click Save to Shared Blueprints to add it to your personal collection.
From there, you can place the blueprint anywhere in your factory with enough space. The game highlights which machines you already own and which ones you need to craft. Construct any missing equipment, connect the inputs and outputs to your existing infrastructure, and you’re good to go.
One important note: blueprint strings are region-specific. The codes in this guide work for NA/EU servers. If you’re playing on a different server, check the original sources for translated versions.
early game blueprints to build first
The opening hours of Arknights: Endfield throw a lot of tutorial information at you without much practical application. Your factory starts small, resources are limited, and figuring out what to prioritize feels overwhelming. These blueprints establish the foundation everything else builds on.
originium crust production
Originium Crust is the simplest refined material in the game and your first consistent source of credits. The setup requires only a Refining Machine connected to your base output. Originium flows in, gets processed into Originium Crust, and returns to storage.
Early on, I recommend placing two or three of these chains running simultaneously. Each unit of Originium Crust sells for one credit at regional outposts. Not glamorous, but steady income matters when you’re still learning the ropes.
amethyst parts chain
Amethyst Parts require a Refining Unit followed by a Fitting Unit. Raw Amethyst enters the refiner, becomes Amethyst Fiber, then moves into the fitter to become Amethyst Parts. Route the finished product back to your base input.
This chain produces materials needed for green batteries, explosives, and various crafting recipes. Getting it running early prevents bottlenecks later when upgrade costs start climbing.
infinite seed loops
Plants like Buckflower and Aketine are essential for consumables and explosives, but manually collecting them from the overworld gets old fast. The Seed-Picking Unit combined with Planting Units creates infinite loops that produce more than you’ll ever need.
Place Buckflower or Aketine into the Seed-Picking Unit. It converts each plant into two seeds. Those seeds enter Planting Units, grow into plants, and cycle back into the Seed-Picking Unit. The loop sustains itself while producing surplus that flows into storage.
The game provides a blueprint for this setup when you complete the plant unit simulation. Use it. The few minutes spent unlocking that simulation save hours of manual farming.
industrial explosives
You can’t progress through certain areas without Industrial Explosives to break red rock obstacles. The chain combines Aketine Powder with Amethyst Components through a Packaging Unit.
Send Aketine through a Shredding Unit to produce powder. Separately, refine Amethyst into fiber, then fit it into components. Both materials enter the Packaging Unit, and explosives come out the other end.
Around 5,000 explosives covers everything you’ll encounter in the current version. Once you hit that number, dismantle the chain and reclaim the space for more useful production.

mid game blueprints for regional trading
Mid game kicks in once you start collecting Ferrium from the Originium Science Park. Your base expansion options open up, technology unlocks accelerate, and regional outposts demand higher-tier goods for better credit payouts.
green battery production
Batteries keep your factory running. When energy consumption exceeds generation, everything stops. Green batteries made from Originium Powder and Amethyst Components fed into Thermal Banks solve this problem.
The formula requires a 2:1 ratio of Originium Powder to Amethyst Components. Set up two Shredding Units processing Originium alongside one refining and fitting chain for Amethyst. All three outputs feed into a single Packaging Unit producing batteries.
Split the battery output between a Thermal Bank for power generation and your base storage for emergency reserves or selling. This balanced approach keeps production humming while building a cushion for future expansion.
blue battery upgrade
Blue batteries swap Amethyst for Ferrium while keeping everything else identical. They generate significantly more power per unit, making them worth the material investment once Ferrium extraction is established.
The same 2:1 ratio applies. Two Shredding Units processing Originium, one refining and fitting chain for Ferrium, all feeding into a Packaging Unit. The efficiency gain over green batteries makes the upgrade a no-brainer once you have stable Ferrium income.
buck capsule production
Buck Capsules are the primary trade goods for regional outposts, and Stock Bills earned from selling them buy critical upgrade materials. Three tiers exist with increasing complexity and value.
Buck Capsule C requires only Amethyst Ore and fetches ten Stock Bills per unit. Buck Capsule B substitutes Ferrite Ore for better returns. Buck Capsule A demands the most complex production chain but generates the highest income.
For mid game, focus on Capsule C or B production depending on your ore surplus. The setup from community creator Farmito is space-efficient and runs at 100% capacity without bottlenecks. Drop it into your factory, connect the ore inputs, and watch the credits roll in.
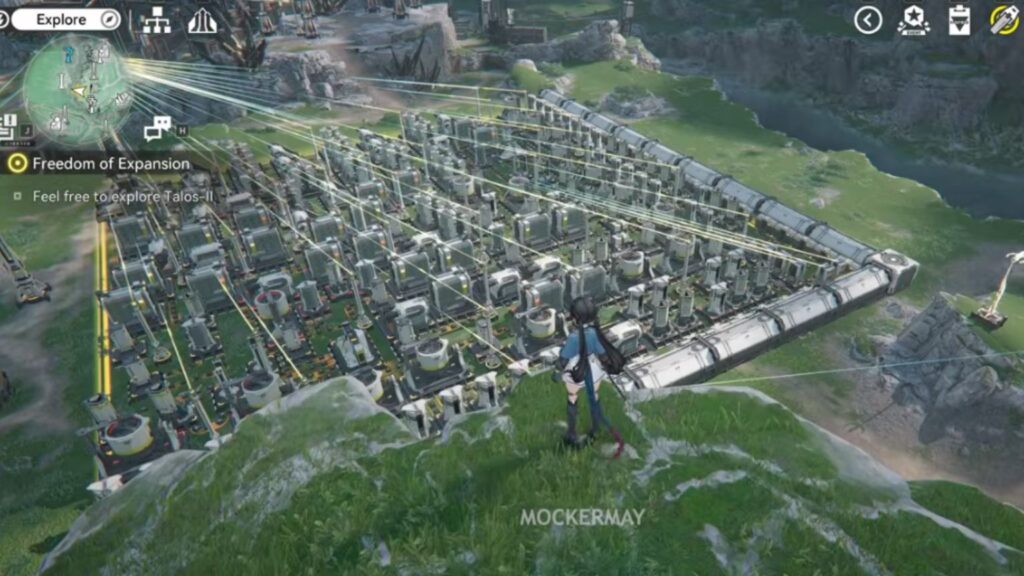
late game blueprints for valley iv and wuling
Late game is where factory building gets serious. Regional Development Level 11 unlocks maximum mining output. Full PAC expansion provides massive building space. Depot Buses add output slots that enable production scales previously impossible.
the renegade mega base
Reddit user Renegade designed a comprehensive Valley IV setup that handles HC Valley Batteries and Buck Capsule A production simultaneously. The blueprint divides into sections covering power generation, high-tier trading goods, and support materials like Cryston Parts and Steel Parts.
HC Valley Batteries require fully upgraded outposts to trade, so you might run the setup as a power station first, creating and splitting SC Valley Batteries until your regional development catches up.
The Buck Capsule A section slots in once your Valley Pass outpost reaches the required level. These capsules have numerous moving parts in their production chain, but Renegade’s layout streamlines everything into manageable segments.
the chinese mega factory
The most optimized factory blueprint currently available comes from the Chinese Endfield community, recreated for NA/EU servers by Wakka_Auroch. This monster produces 18 Buck Capsule A and 18 HC Valley Batteries per minute.
Setting it up requires preparation. Stockpile several thousand Amethyst Parts, Ferrium Parts, and Carbon for machinery construction. Accumulate Sandleaf seeds to fuel the planting loops. Build up hundreds of HC Valley Batteries to power outpost generators during startup.
Once running, this factory generates enough income to trivialize the Valley IV economy. Set it and forget it while you focus on Wuling progression.
wuling starter base
Wuling operates differently from Valley IV. Xiranite replaces traditional materials. Wireless pylons eliminate cable routing. Water sources fuel production of region-exclusive items.
The Forge of the Sky processes Xiranite but has a hard cap in version 1.0. A technology upgrade unlocks a second forge, doubling output. Hold your Wuling AIC Indices until that upgrade becomes available.
Community creator Hisae designed a quick-and-dirty starter base that gets Xiranite, Xiranite Components, and LC Wuling Batteries flowing immediately. It’s not pretty, but functionality matters more than aesthetics when you’re establishing your foothold in a new region.
yazhen syringe production
After unlocking the Sky King Flats outpost, Yazhen Syringe C production becomes your primary path to rapid regional development. Creator Aorta designed a space-conscious line requiring only the first Bus Depot upgrade.
Wuling’s Ferrium scarcity creates challenges here. Only one Ferrium node currently exists in the region. The Metastorage Transfer function at Regional Development Level 12 in Valley IV compensates for the deficiency. Reaching that milestone before pushing Wuling production hard prevents frustrating resource shortages.
general blueprint tips
Efficiency matters less than functionality during early progression. A blueprint running at 70% capacity still produces resources. A perfectly optimized chain that never gets built produces nothing. Start with working setups and refine later.
Depot Buses transform late game factory potential. Each bus adds output slots that multiply how many production lines you can run simultaneously. Prioritize unlocking them through the technology tree.
Watch for overflow in storage units and thermal banks. Machines stop working when their outputs have nowhere to go. Adding splitters or secondary storage prevents production stalls.
keep building
The AIC factory system rewards patience and planning but doesn’t demand perfection. Importing community blueprints gets you 90% of the way to optimal production without the headache of designing everything yourself. Save your creativity for team building and combat strategies.
For the complete picture on how factory output connects to operator progression, daily activities, and late game goals, check out the ultimate Arknights: Endfield guide covering every system in the game.
